Disqus for Where Are My Knees

Pork and Egg Burgers

Thursday 24 April 2014

This post is brought to you by the very lovely Leanne who blogs over at A Slice of my Life, make sure you pop over to check out all her lovely posts about homeware, make up and all the lovely food she eats on the SW plan.

I occasionally follow Slimming World (I've fallen a little off the wagon and am desperately trying to get back on board), one of the things that I love about the SW plan is the freedom that comes with it, most food is possible provided that you cook it in the right way. Burgers and chips on a diet, no problem!


These pork and egg burgers are my latest pride and joy. They are Syn free on the extra easy plan, super easy to make and very aesthetically pleasing, oh and they taste pretty good too! 


You will need : Extra lean pork mince, one egg per burger, fry light and seasoning. I haven't added an amount for the pork as this really is a simple, flexible recipe - you can make them as big or small as you like, I personally tend to make these when I have a little leftover pork mince.

Add salt and any other required seasoning to your pork mince (I just use salt & pepper, hubby throws in every single spice/herb going!) and roll into doughnut shaped rings. 


Carefully transfer the pork 'doughnuts' into a pan sprayed with Fry Light and crack an egg into the centre of each one. Your egg may or may not leak out of the bottom, this really doesn't matter as the majority will stay in the centre.


The cooking time is dependant on the amount of mince that you use, mine take around 10 minutes on each side but I do tend to overcook meat. 

When the bottom half has browned nicely transfer the pan to the grill to cook the top half of the burgers on a medium heat. You can flip the burgers and continue to cook in the pan if you so wish, however I personally find that this ruins how the egg looks.


Sprinkle on some chives to make them look really awesome! 


If anyone is wondering, this is how they look underneath.

Serve with Slimming World style chips and a salad for a delicious, Syn free meal.

10 uses for coconut oil and Chi giveaway

Tuesday 15 April 2014

Coconut oil is being touted as a bit of a wonder product at the moment and it's easy to see why. It's super versatile and you would be surprised by some of its uses. I've been using my big jar for a couple of months now and here are my top 10 ways of using coconut oil:

  1. Because coconut oil is solid at room temperature, it makes a great substitute for butter, margarine, or other spreads. Vegans don't eat any animal products so coconut oil a great alternative for them.
  2. Just put a tiny amount on your hands and run them through the frizzy areas and your split end will look much better. 
  3.  Use it as a make up remover. If you’re into the oil cleansing method, coconut oil is great for cleaning. Rub a bit between your hands until it softens or melts then rub all over your face then wipe away with a hot cloth. 
  4. The oil is great or your teeth.  Swish some coconut oil around your mouth for a few minutes in the morning to 'pull' bacteria out of your mouth. Spit and rinse with water.
  5. Apply directly after showering for super soft skin. It's especially good on dry patches like elbows and heels.
  6. It can be used as a stretch mark preventer, great for pregnant ladies.
  7. Rub it on your lips and use as a natural chap stick.
  8. You can use it to season cast iron pans and make them last a lot longer.
  9. Mix it with salt to make a foot scrub and remove dry skin on feet.
  10. It's a great way of saving space when you go on holidays. It can be used for so many reasons and you only need to pack one jar instead of loads of bottles and tubs. 
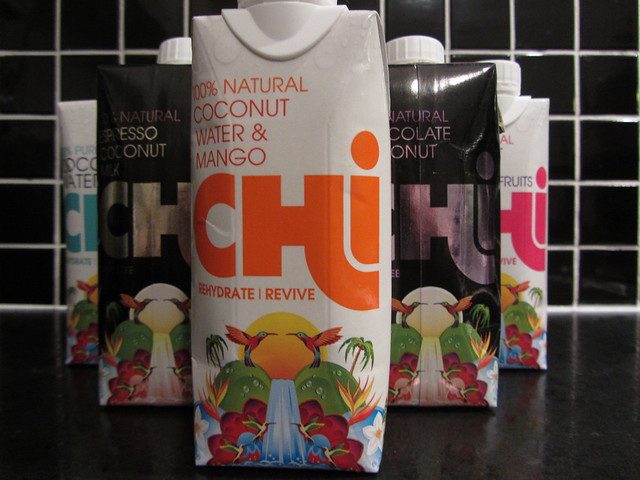
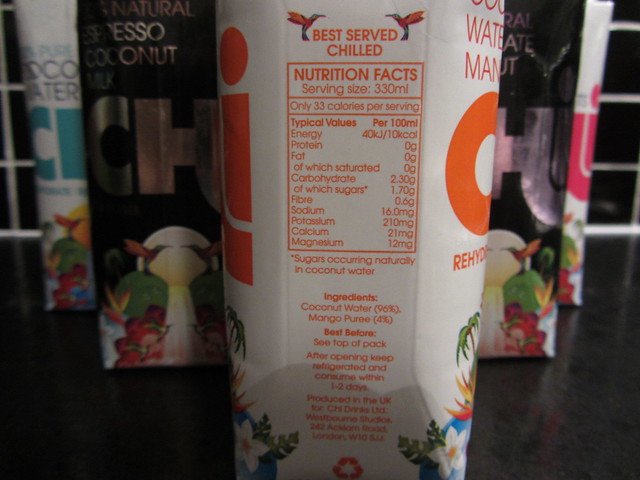
I'm a coconut oil convert but I had never tried coconut water until recently. Coconut water has been used for re-hydration and as a health and beauty aide in tropical regions around the world for centuries. It’s low in fat and calories, has no cholesterol, and has a natural balance of sodium, potassium, calcium and magnesium- making it a truly healthy electrolyte drink or sports drink alternative. Chi's special harvesting and processing procedures allow them to package and pasteurize natural Coconut Waters that are biologically pure, with no need for adding any preservatives. Sounds good right?


Not only do they offer regular coconut water then also offer Pineapple, Tropical and Mango flavours and dairy free and prebiotic Chocolate and Coffee Coconut Milks which are all natural, never from concentrate and always delicious. I had never tried coconut water before tasting Chi and I was surprised by the taste. It doesn't have that artificial coconut taste that some products tend to have, it is sweet and very refreshing. My brother is a bit of a coconut water conniseur and assures me that the fruit flavoured ones are some of the best he has tasted. The coconuts used for Chi products come from a plantation in Thailand, in a region known for having some of the sweetest coconuts in Thailand.


If you would like to try both the oil and coconut water from Chi then make sure you enter the competition below.


a Rafflecopter giveaway

How to Make the Perfect Green Smoothie

Sunday 13 April 2014


Green smoothies have almost become the height of fashion in the celebrity world – every health conscious star has been spotted carrying one.  Before the green smoothie craze, many in the healthy living blogger world have been drinking this green liquid goodness for years.  I for one love my green smoothies, but it was a struggle at first.  Initially blending up spinach and kale into a drink didn’t really appeal, but now my confidence has grown and I think that I have got the perfect green smoothie down to a T.


So why are green smoothies considered to be so good for our health?

Smoothies have been on the tips of the tongues of many nutritionists for years, advocating them as a healthy snack or breakfast.  They are usually made up of fruit with yoghurt or milk, or just a basic protein smoothie.  Green smoothies however take it one step further and are packed with green earthy vegetables, meaning that they are bursting with a multitude of vitamin and minerals for your body.

Some of the health benefits include:

  •  Increased intake of fruit and vegetables 
  • A boost of antioxidants
  • Improved energy levels
  • High in fibre
  • Easier digestion
  • Fast absorption of nutrients
  • Clear skin
  • Improved well being
  • Balances the bodies pH levels
  • Detoxifies the body
  • Contains a high level of chlorophyll


Since all of the contents of the smoothie are blended, the cells of the plants are broken down which makes it easier for the digestive system to process.  Also, there is an enhanced assimilation of vitamins and minerals.  Blending up the vegetables and fruit allows the body to absorb the nutrients a lot faster if you were to chew them.  The high levels of chlorophyll in the green smoothies help to boost your immune response.


When making your perfect green smoothie there are just a few things to think about, mainly how are you going to make it super delicious.  Here are some of my own tips and things to consider that help me make my green smoothies magical:


Liquids to blend with


Most smoothies always consist of a base and this may be unsweetened almond milk (or a milk of your choice), coconut water, or just plain water will do.  Adding a liquid will ensure that all of your ingredients are well combined and smooth in your…erm smoothie.


Choosing my greens


Dark earthy greens are best in green smoothies as they are packed full of nutrients and vitamins.  I tend to stick to spinach and kale as they are easily blended, but cavolo nero, chard and beet greens would also work well.


Adding my favourite fruits


Fruits add a natural sweetness to green smoothies and there are really no limits.  I love to add pineapple, banana, mango, peaches, apples and frozen berries to mine – the choice is yours!


Making your smoothie super


Adding powdered superfoods, nut butters or protein powders to your smoothie increases their nutritional value immensely.  Ingredients such as maca powder, camu camu berry powder, spirulina or lucuma powder are full of added health benefits in their own right.  The addition of protein powder makes the smoothie more satisfying and perfect for a healthy breakfast. 


Sweeten it up


If you have a bit of a sweet tooth you can add sweeteners to your smoothie such as honey, agave nectar, coconut sugar and maple syrup.


So there you have it, my guide to making the perfect green smoothie.  Don’t be scared by the fact they are green.  There are so many different varieties and possibilities that you can create.  To start off with perhaps try a simple spinach, banana, peanut butter and almond milk smoothie.  If you follow these simple tips you will be dusting off your blenders in no time!


This post was written by Jemma Andrew-Adiamah, author of the UK healthy living and lifestyle blog Celery and Cupcakes.  You can follow Jemma via her Facebook and Twitter feeds.

Staying healthy in the office

Thursday 10 April 2014


I find that my colleagues have a big influence in my diet and exercise habits. I work in a team of mostly ladies, and it's our usual topic of conversation. We're good at inspiring each other to be healthier... but we can also lead each other astray. Burger King Fridays have become a little too regular lately.

In collaboration with Fruitdrop, I've put together a few tips on staying healthier in the workplace. I know how easy it is to be led astray at work, but what we should be trying to do is be the people who lead people down the good track!

1. Instead of buying cakes and sweets, buy fruit or subscribe to a fruit delivery service like Fruitdrop.

2. Start a lunchtime walking club with your colleagues to burn a few calories before you eat your sandwich.

3. Share your lunchbreak with a colleague, and take turns to make each other awesome salads.

4. Quit the lift and take the stairs! Alternatively (or as well) park a little further away than usual to give yourself more exercise, or get off the bus a stop early.

5. Reward yourself! Go on a team lunch every month somewhere tasty, to make up for all your hard work.

Fruitdrop boxes start from just £20 and they deliver straight to your office! All the fruit is super fresh and yummy (seriously, my colleauges were raving about the pears) and we're now looking into getting a regular delivery. I highly recommend them as a way to kickstart your office to be healthier!


Written in collaboration

Dear Kate...

Wednesday 9 April 2014

The Dear Kate website made me chuckle when it stated 'Laugh til you pee your pants. And strut your stuff safely...we've got your butt covered.' 1 in 4 women experience light bladder leakage on a regular basis and 60% of women experience overflow during that time of the month every month. We never talk about this despite so many of us ladies experiencing it and I love that Dear Kate can mention it openly and even make us laugh about it.

Dear Kate offers pretty underwear in a range of styles from simple lace to bold colours, all featuring absorbent and stain-resistant linings. They are designed to offer extra protection when a woman might need it during menstruation, exercise or after having a baby.


I tried out the Amelia Hipster Mini from the Queen collection and was really pleased with the fit and femininity of the briefs considering they are very functional and designed to help with leakage. After measuring my hips I went for the 1X, which is an American 16-18. I would say that they are very true to size and wont dig in so there's no need to size up. They came in a cute box which is a nice touch and I tend to keep them in there after washing so I don't have to wade through 40 pairs of black knickers to find them.

I've worn these whilst doing the 30 Day Shred and at the gym and they can hold up to one teaspoon of liquid or three if you get the full lining. There were no embarrassing wet patches in sight. Stress incontinence (gross, I know) can occur during exercise and I think these briefs would be great for anyone attempting a long distance run. The Sports range would be even more ideal for this function but they are only currently sold in regular sizing with no plus size option available yet.


This is what my pair look like:


Pretty good, right? That time of the month can be pretty crappy. You feel bloated and a bit sorry for yourself. With these the lace waistband is a pretty detail and the shape is much nicer than my 3 in a pack, M&S briefs I normally go for when I'm not feeling my best.Wearing these meant that I didn't have to worry about any embarrassing accidents and I felt much more confident.


Do you think about your underwear when working out? I know I always wear a sports bra but I had never paid much attention to my briefs before trying these ones.

If you want to get your own pair the code "WhereAreMyKnees" will get new customers 25% off until April 30th.

Buffalo Chicken Mac 'n' Cheese

Wednesday 2 April 2014


When I saw this recipe on The Greedy Girls recently I couldn't stop thinking about it. I was having a batch cooking day recently and decided to give it a shot, but first I modified the recipe so it was a little more Weight Watchers friendly. The key to making a rich sauce lower fat is to spread it across more portions - you still get all the flavour, but you're just making it go a little further. I then just substituted some of the full fat elements for lighter options, and presto... it was awesome.

This is a really, really tasty dish. It's quite time consuming to make, but it's so worth it when you get there. It's also super rich - I haven't been super good lately so my appetite has grown a bit, but every time I eat this I'm surprised at how full I am, considering it's only 40g of pasta per portion. I think I ate the last portion today, and I'm going to have to make it again crazy soon. New favourite recipe, right here.

Full credit for this goes to Amy from The Greedy Girls - I just tweaked it a bit!

Buffalo Chicken Mac 'n' Cheese
500g chicken breasts = 12PP
320g macaroni or pasta = 31PP
1tsp brown sugar = 1PP
4 tsp Lurpak Lighter = 3PP
1 tbsp plain flour = 2PP
240ml semi skimmed milk = 3PP
170g cheddar cheese = 14PP
125g light mozzarella = 6PP
2 cloves of garlic, crushed
1 red onion, sliced
2 peppers, diced
2 cartons of passata
Two teaspoons of cumin
Chilli flakes
Two tablespoons of paprika

72PP / 9PP (serves 8)

1. Place the chicken breasts (whole) and the pasta in a large saucepan. Cover with boiling water, then add a few inches more water. Add a generous pinch of salt, and cook for around 20 minutes. Drain and set the macaroni aside.
2. Pull out the chicken breasts, shred with a couple of forks and set the meat aside. Keep the saucepan ready for later, too.
3. Meanwhile, fry the garlic and onion on a low heat for five minutes. Add the peppers and fry for five minutes more. Tip in the passata, the cumin, a shake of chilli flakes (depending on how hot you like you food), the paprika and the sugar. Add anything else you think it needs for flavour - I added a splash of balsamic vinegar and a spoonful of artificial sweetener.
4. Stir the sauce through the shredded chicken (FYI - if you struggle with the shredding, chopped is fine. I bought diced breasts so shredding them wasn't the easiest feat!). Season with salt and pepper and leave to bubble on a low heat.
5. That's the buffalo chicken part done - now onto the mac 'n' cheese! In a small saucepan melt the butter.
6. Add the flour to the butter and stir to combine. Then add the milk, a splash at a time, mixing well between each addition. You’ll end up with a thick, gloopy sauce. If it's too thin, add more flour.
7. Add around half the cheddar and stir to melt into the sauce. Season with salt and pepper to taste.
8. Preheat the oven to 200C.
9. Put the pasta back in the big saucepan and tip the cheese sauce over the top. Stir to coat the pasta.
10. In an large, ovenproof dish, layer half of the buffalo chicken on the bottom of the dish. Then add half of the macaroni and cheese on top of that. Top with the remaining half of the buffalo chicken mix and finally the rest of the mac ‘n’ cheese. Don't worry if your layers aren't neat, it's best all mixed up.
11. Tear the mozzarella up and distribute over the top of the dish. Then sprinkle over the remaining cheddar.
12. Bake for around 20 minutes, until the cheese is golden brown. This freezes really well - I might even have added another 2PP worth of cheese onto it when I reheated. SO GOOD.